
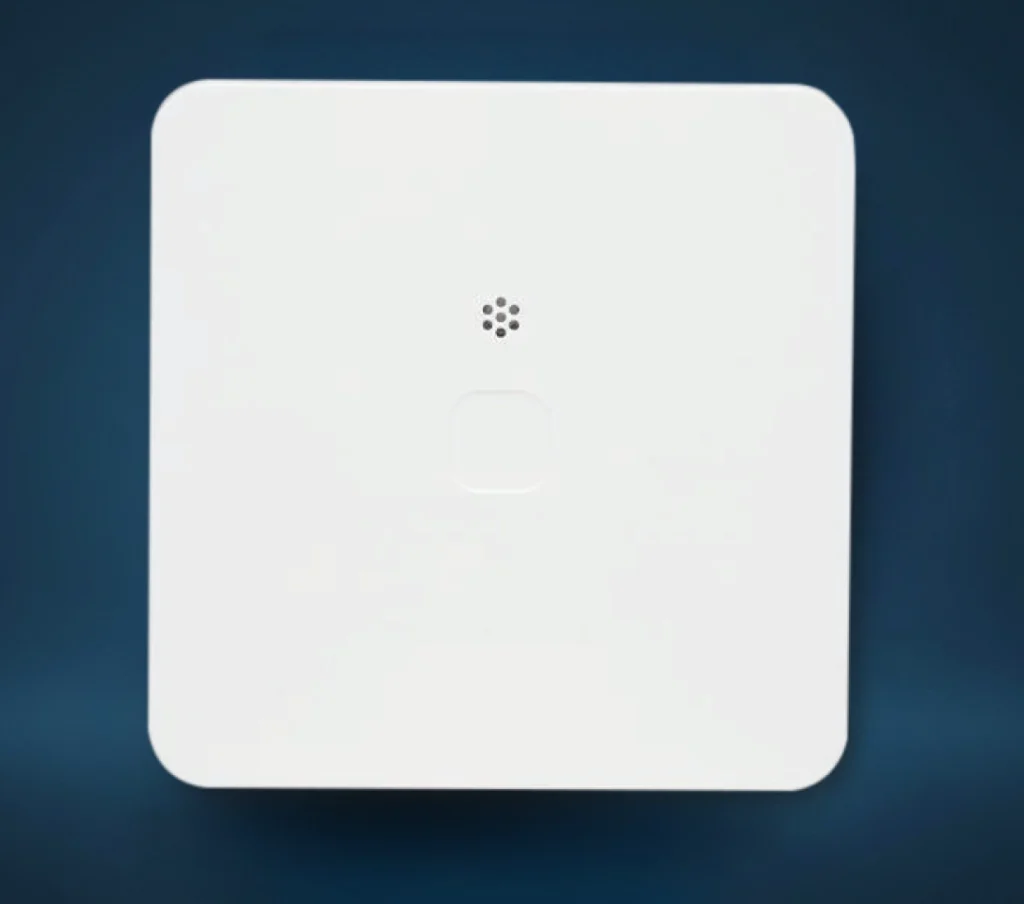
Specs
Dimensions: 2.6 in (L) x 2.6 in (W) x 0.43 in (H) 65 mm (L) x 65 mm (W) x 11mm (H)
Communication: PowerG+
Operating Temperature Range: -10°C (14°F) to 55°C (131°F)
Relative humidity: Up to 93% non-condensing
Use: Indoor
Power: Wireless, Battery
Colours
White
Documentation
Data Sheet
Installation Guide
Brochure
How to Change the Battery
CAUTION: Do not replace the battery with an incorrect battery type. See Specifications for acceptable battery types. Dispose of used batteries according to the manufacturer’s instructions and according to local rules and regulations.
Important: The batteries are shipped with reverse polarity, which means they are pre-installed in the device upside down. To power up the device for the first time, reinsert the batteries with the positive (+) symbol facing up.
Note: It is recommended to use a flat screwdriver #2.
1. Carefully insert a flat-head screwdriver to the corner slot shown in the image below (A).
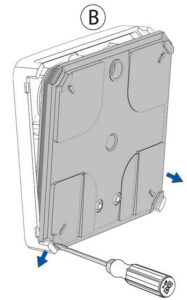
2. Apply gentle pressure to the screwdriver at an angle to lift open the device’s inside cover tabs(B). Be cautious not to apply too much force, because this could break the tabs.
3. Repeat steps one and two for each corner tab, and then remove the cover (C).
Figure 2: Removing the cover
Note: Do not use an electric screwdriver. This causes damage to the plastic enclosure.
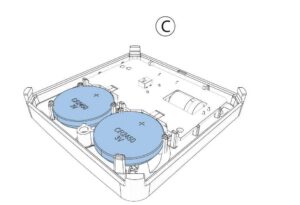
4. Pull the front clasp back and release the battery. See Figure 3.
Figure 3: Removing the battery
Note: Do not use a screwdriver or other metal tool to remove the battery.
5. Insert the new battery at an angle under the two back clasps (A). See Figure 4.
6. Push the battery down under the front clasp.
Note: When you insert the battery, ensure the (+) symbol is visible.
7. Snap the device cover back into place. See the following figure.
Do a visual check to ensure the cover is completely closed.
After you restore a low battery, the system takes up to 5 minutes to clear the trouble.
Figure 5: Closing the device cover
Signal Strength Indicators
Checking the signal strength on the panel
2. Enter the installer code.
3. Select System tests > PowerG Test > Run.
The panel displays the signal strength strong, good, poor, or no signal.
Frequently Asked Questions
How do I see my Smart Temperature Sensor in the app?
The Smart Water Tile helps detect water leaks and low temperature conditions in your home. It is commonly placed near water heaters, sump pumps, washing machines, sinks, toilets, basement areas, and mechanical rooms.
When water is detected, the device can alert your alarm system and sound locally so you can respond before a small leak turns into a larger problem.
Where should I place my Smart Water Tile?
Place the Smart Water Tile where water is most likely to appear first. Good locations include beside a water heater, near a sump pump, behind a washing machine, under a sink, near a toilet, beside a dishwasher, or on a basement floor close to plumbing.
The best location is not always the most hidden one. It should sit where leaking water would naturally collect.
Does the Smart Water Tile detect freezing temperatures?
Yes. The Smart Water Tile can detect low temperature conditions that may increase the risk of frozen pipes.
This is useful in basements, utility rooms, garages that are still suitable for the device, crawlspace-adjacent areas, and other places where temperature drops may happen before you notice them.
At what temperature does the freeze alert activate?
The Smart Water Tile is designed to trigger a low temperature or freeze warning at approximately 5°C, or 41°F.
This alert is meant to give you early warning before conditions become more serious. It does not replace proper heating, pipe insulation, or winter maintenance.
Why am I not getting freeze alerts from my Smart Water Tile?
Freeze alerts may depend on your alarm panel, system programming, and how the device was enrolled.
If your Smart Water Tile detects water but does not report low temperature conditions, the freeze feature may not be supported in your current setup or may need to be reviewed by Grand Alarms. This is not something to guess at, because guessing is how basements become indoor ponds.
How do I know when the Smart Water Tile has detected water?
When water is detected, the Smart Water Tile can sound its built-in buzzer, flash its LED indicator, and send a signal to your alarm system.
Depending on your system setup, you may also receive an alert through your Grand Alarms smart home app. The alert may appear as a water alarm, flood alarm, leak alert, or sensor alarm.
What should I do when I receive a water alert?
Check the area immediately. Look around the Smart Water Tile and nearby plumbing, appliances, shutoff valves, hoses, drains, and floor areas.
If you find water, stop the source if it is safe to do so. Then dry the area and the Smart Water Tile completely. If the leak is active or you cannot identify the source, contact a plumber or the appropriate service provider.
Why is my Smart Water Tile still in alarm after I cleaned up the water?
The sensing contacts may still be wet, or moisture may still be present around the device, external probe, or sensing cable.
Remove the Smart Water Tile from the area and dry it with a soft cloth. If an accessory is connected, dry that too. Let everything air dry fully before placing it back. Even a small amount of moisture can keep the alarm active.
Can I test the Smart Water Tile myself?
Yes, but test it carefully. Place a small amount of water on a safe surface and set the Smart Water Tile so the sensing contacts touch the water.
Once the alarm activates, remove the device and dry it completely. Do not submerge it, soak it, or pour water into the device housing. You are testing the contacts, not giving it a bath.
What batteries does the Smart Water Tile use?
The Smart Water Tile uses two CR2450 coin batteries.
Always use the correct battery type and replace both batteries at the same time. Do not mix old and new batteries. Keep coin batteries away from children and pets.
How do I replace the batteries in the Smart Water Tile?
Open the device cover carefully and remove the old batteries. Insert two new CR2450 batteries with the positive side facing the correct direction.
After replacing the batteries, close the cover fully. If the cover is not seated properly, the system may show a tamper alert. Give the system a few minutes to update after the battery change.
Why does my Smart Water Tile show a tamper alert?
A tamper alert usually means the cover is open, loose, or not snapped into place correctly.
Check the cover and make sure the device is fully closed. If the alert appeared after replacing the batteries, the cover may not have clicked back into place. A tiny gap is enough to annoy the system, because alarm devices are dramatic like that.
Why is my Smart Water Tile showing low signal or no signal?
Low signal or no signal means the alarm panel is having trouble communicating with the Smart Water Tile.
This can happen if the device is too far from the panel, placed near metal, blocked by dense walls, sitting too low in a difficult area, or affected by interference. Try moving it slightly to a more open position. If the issue continues, Grand Alarms can check the signal and placement.
Can the Smart Water Tile shut off my water automatically?
The Smart Water Tile itself does not shut off the water. It detects water and sends an alert through your alarm system.
Automatic water shutoff requires a compatible water shutoff valve or water management device connected to your system. If you want the system to detect a leak and help stop the water supply, Grand Alarms can review compatible options.
Can I connect a probe or sensing cable to the Smart Water Tile?
Yes. The Smart Water Tile can be used with compatible external probe or sensing cable accessories.
These accessories are useful when you want to monitor a specific hard-to-reach area, a larger floor section, or a space where the tile itself cannot sit in the ideal location. The accessory must be installed correctly so water can reach the sensing area.
Is the Smart Water Tile waterproof?
No. The Smart Water Tile is designed to detect water, but it should not be submerged or left sitting in standing water.
If it gets wet during an alarm, dry it fully before putting it back into service. If the device was soaked, damaged, or exposed to heavy water, contact Grand Alarms to confirm whether it is still working properly.
Why did I get a water alert when there is no leak?
A false water alert can happen if the sensor contacts touched moisture, condensation, cleaning solution, a damp floor, spilled water, or a wet accessory.
Check the device, floor, probe, and sensing cable. Dry everything completely. Also check whether the device was recently moved, cleaned around, or placed somewhere condensation can form.
What maintenance does the Smart Water Tile need?
Keep the Smart Water Tile clean, dry, flat, and in the correct location. Check that it has not been covered, moved, flipped over, or blocked.
Replace the batteries when needed, test it periodically, and dry it fully after any water alarm. A water sensor is only useful if water can actually reach it. That sounds obvious, but storage bins and laundry baskets have ruined better plans.
Refer a Friend or Family Member
When someone you refer joins Grand Alarms, you’ll receive 2 months of free service as a thank-you.
Specs
Dimensions: 2.6 in (L) x 2.6 in (W) x 0.43 in (H) 65 mm (L) x 65 mm (W) x 11mm (H)
Communication: PowerG+
Operating Temperature Range: -10°C (14°F) to 55°C (131°F)
Relative humidity: Up to 93% non-condensing
Use: Indoor
Power: Wireless, Battery
Available Colours
White
Documentation
Data Sheet
Installation Guide
Brochure
How to Change the Battery
CAUTION: Do not replace the battery with an incorrect battery type. See Specifications for acceptable battery types. Dispose of used batteries according to the manufacturer’s instructions and according to local rules and regulations.
Important: The batteries are shipped with reverse polarity, which means they are pre-installed in the device upside down. To power up the device for the first time, reinsert the batteries with the positive (+) symbol facing up.
Note: It is recommended to use a flat screwdriver #2.
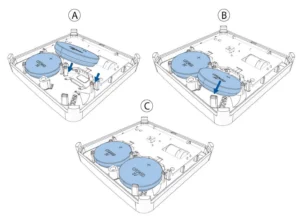
1. Carefully insert a flat-head screwdriver to the corner slot shown in the image below (A).
2. Apply gentle pressure to the screwdriver at an angle to lift open the device’s inside cover tabs(B). Be cautious not to apply too much force, because this could break the tabs.
3. Repeat steps one and two for each corner tab, and then remove the cover (C).
Figure 2: Removing the cover
Note: Do not use an electric screwdriver. This causes damage to the plastic enclosure.
4. Pull the front clasp back and release the battery. See Figure 3.
Figure 3: Removing the battery
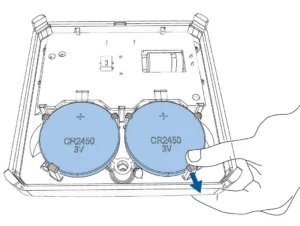
Note: Do not use a screwdriver or other metal tool to remove the battery.
5. Insert the new battery at an angle under the two back clasps (A). See Figure 4.
6. Push the battery down under the front clasp.
Note: When you insert the battery, ensure the (+) symbol is visible.
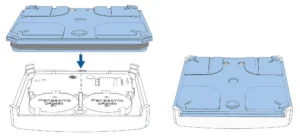
7. Snap the device cover back into place. See the following figure. Do a visual check to ensure the cover is completely closed.
After you restore a low battery, the system takes up to 5 minutes to clear the trouble.
Figure 5: Closing the device cover
Signal Strength Indicators
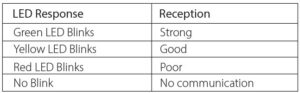
LED Response Reception
Green LED Blinks Strong
Yellow LED Blinks Good
Red LED Blinks Poor
No Blink No communication
Checking the signal strength on the panel
Frequently Asked Questions
How do I see my Smart Temperature Sensor in the app?
The Smart Water Tile helps detect water leaks and low temperature conditions in your home. It is commonly placed near water heaters, sump pumps, washing machines, sinks, toilets, basement areas, and mechanical rooms.
When water is detected, the device can alert your alarm system and sound locally so you can respond before a small leak turns into a larger problem.
Where should I place my Smart Water Tile?
Place the Smart Water Tile where water is most likely to appear first. Good locations include beside a water heater, near a sump pump, behind a washing machine, under a sink, near a toilet, beside a dishwasher, or on a basement floor close to plumbing.
The best location is not always the most hidden one. It should sit where leaking water would naturally collect.
Does the Smart Water Tile detect freezing temperatures?
Yes. The Smart Water Tile can detect low temperature conditions that may increase the risk of frozen pipes.
This is useful in basements, utility rooms, garages that are still suitable for the device, crawlspace-adjacent areas, and other places where temperature drops may happen before you notice them.
At what temperature does the freeze alert activate?
The Smart Water Tile is designed to trigger a low temperature or freeze warning at approximately 5°C, or 41°F.
This alert is meant to give you early warning before conditions become more serious. It does not replace proper heating, pipe insulation, or winter maintenance.
Why am I not getting freeze alerts from my Smart Water Tile?
Freeze alerts may depend on your alarm panel, system programming, and how the device was enrolled.
If your Smart Water Tile detects water but does not report low temperature conditions, the freeze feature may not be supported in your current setup or may need to be reviewed by Grand Alarms. This is not something to guess at, because guessing is how basements become indoor ponds.
How do I know when the Smart Water Tile has detected water?
When water is detected, the Smart Water Tile can sound its built-in buzzer, flash its LED indicator, and send a signal to your alarm system.
Depending on your system setup, you may also receive an alert through your Grand Alarms smart home app. The alert may appear as a water alarm, flood alarm, leak alert, or sensor alarm.
What should I do when I receive a water alert?
Check the area immediately. Look around the Smart Water Tile and nearby plumbing, appliances, shutoff valves, hoses, drains, and floor areas.
If you find water, stop the source if it is safe to do so. Then dry the area and the Smart Water Tile completely. If the leak is active or you cannot identify the source, contact a plumber or the appropriate service provider.
Why is my Smart Water Tile still in alarm after I cleaned up the water?
The sensing contacts may still be wet, or moisture may still be present around the device, external probe, or sensing cable.
Remove the Smart Water Tile from the area and dry it with a soft cloth. If an accessory is connected, dry that too. Let everything air dry fully before placing it back. Even a small amount of moisture can keep the alarm active.
Can I test the Smart Water Tile myself?
Yes, but test it carefully. Place a small amount of water on a safe surface and set the Smart Water Tile so the sensing contacts touch the water.
Once the alarm activates, remove the device and dry it completely. Do not submerge it, soak it, or pour water into the device housing. You are testing the contacts, not giving it a bath.
What batteries does the Smart Water Tile use?
The Smart Water Tile uses two CR2450 coin batteries.
Always use the correct battery type and replace both batteries at the same time. Do not mix old and new batteries. Keep coin batteries away from children and pets.
How do I replace the batteries in the Smart Water Tile?
Open the device cover carefully and remove the old batteries. Insert two new CR2450 batteries with the positive side facing the correct direction.
After replacing the batteries, close the cover fully. If the cover is not seated properly, the system may show a tamper alert. Give the system a few minutes to update after the battery change.
Why does my Smart Water Tile show a tamper alert?
A tamper alert usually means the cover is open, loose, or not snapped into place correctly.
Check the cover and make sure the device is fully closed. If the alert appeared after replacing the batteries, the cover may not have clicked back into place. A tiny gap is enough to annoy the system, because alarm devices are dramatic like that.
Why is my Smart Water Tile showing low signal or no signal?
Low signal or no signal means the alarm panel is having trouble communicating with the Smart Water Tile.
This can happen if the device is too far from the panel, placed near metal, blocked by dense walls, sitting too low in a difficult area, or affected by interference. Try moving it slightly to a more open position. If the issue continues, Grand Alarms can check the signal and placement.
Can the Smart Water Tile shut off my water automatically?
The Smart Water Tile itself does not shut off the water. It detects water and sends an alert through your alarm system.
Automatic water shutoff requires a compatible water shutoff valve or water management device connected to your system. If you want the system to detect a leak and help stop the water supply, Grand Alarms can review compatible options.
Can I connect a probe or sensing cable to the Smart Water Tile?
Yes. The Smart Water Tile can be used with compatible external probe or sensing cable accessories.
These accessories are useful when you want to monitor a specific hard-to-reach area, a larger floor section, or a space where the tile itself cannot sit in the ideal location. The accessory must be installed correctly so water can reach the sensing area.
Is the Smart Water Tile waterproof?
No. The Smart Water Tile is designed to detect water, but it should not be submerged or left sitting in standing water.
If it gets wet during an alarm, dry it fully before putting it back into service. If the device was soaked, damaged, or exposed to heavy water, contact Grand Alarms to confirm whether it is still working properly.
Why did I get a water alert when there is no leak?
A false water alert can happen if the sensor contacts touched moisture, condensation, cleaning solution, a damp floor, spilled water, or a wet accessory.
Check the device, floor, probe, and sensing cable. Dry everything completely. Also check whether the device was recently moved, cleaned around, or placed somewhere condensation can form.
What maintenance does the Smart Water Tile need?
Keep the Smart Water Tile clean, dry, flat, and in the correct location. Check that it has not been covered, moved, flipped over, or blocked.
Replace the batteries when needed, test it periodically, and dry it fully after any water alarm. A water sensor is only useful if water can actually reach it. That sounds obvious, but storage bins and laundry baskets have ruined better plans.


