
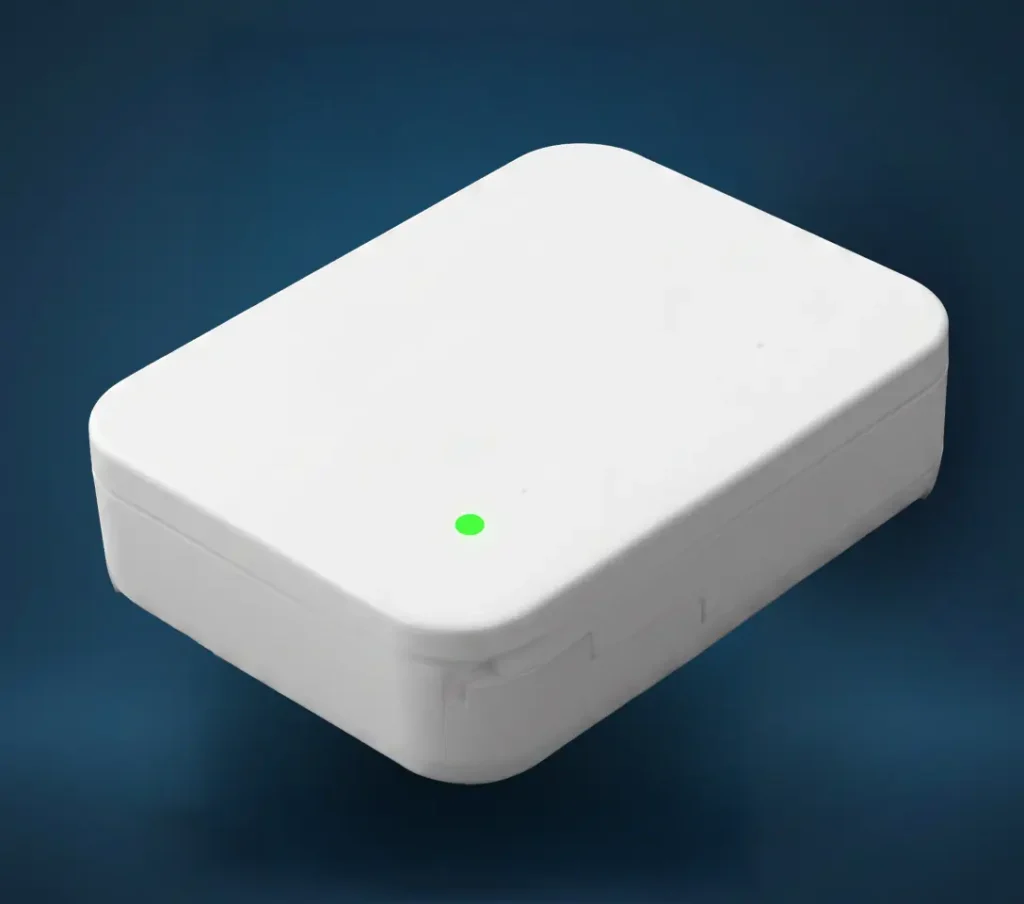
Specs

Dimensions: 1.2 x 1.6 x 0.47’’ (30.8 x 40.8 x 11.9 mm)

Communication:
Z-Wave SmartStart
Z-Wave S2
Authenticated/Unauthenticated

Operating Temperature Range: 14°F to 158°F (-10°C to 70°C)

Operating humidity: 80% (non-condensing)

Use: Indoor

Power: Wireless, Battery 

Colours

White

Documentation

This sensor contains a user replaceable coin cell battery. If the sensor has reported a low battery or is not illuminating the front LED when the sensor is slid open, replace the battery.

Important: Prior to replacing the battery, take note of the Coin cell battery notices.

  1. Slide the ADC-S40-T open. The LED should turn on then off within a few seconds.

    slide device open
     
  2. Remove screw.

    remove screw
     
  3. Replace the battery with one CR2450 coin cell battery, then replace screw.

    replace battery, screw
  4. Slide door back into place. The LED on the front cover will blink to indicate the sensor has powered on.
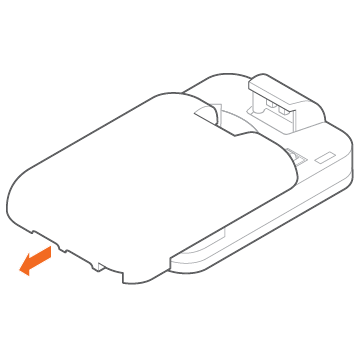
    slide cover closed
If the sensor is not communicating with the Z-Wave controller
  1. Slide the device open. The LED should turn on and then turn off within a few seconds.

    Alarm.com Temperature Sensor (ADC-S40-T) - Sliding Open

    If the LED behavior is different, the sensor cannot communicate with the Z-Wave controller. Follow these steps to fix the communication problems:
    1. Install a Z-Wave repeater between the Z-Wave controller and the sensor.
       
      Note: Any AC-powered Z-Wave device will act as a repeater and improve the range between the Z-Wave controller and the Z-Wave device you are installing.
       
    2. If the previous step does not resolve the issue, try deleting the sensor from the network (see next section) and add it again.
  1. Install the Z-Wave controller.
  2. Place all other Z-Wave devices in their final locations.
  3. If installing other Z-Wave devices, make sure to install and add them to the network first. After all other Z-Wave devices have been added to the network:
    1. Run a Network Rediscovery.
    2. Verify that the Link Quality for all devices is good.
  4. Ensure the panel and the Temperature Sensors are in their final locations.
  5. Log in to the Partner Portal or MobileTech app. 
  6. Find the customer account.
  7. Put the Z-Wave controller into Add Mode:
    • To put the panel into Add Mode using the Partner Portal:
      1. Click Equipment.
      2. Click Z-Wave Devices.
      3. In Manage Devices, click Add a Z-Wave Device.
    • To put the Z-Wave controller into Add Mode using the MobileTech app:
      1. Tap Equipment.
      2. Tap Z-Wave Devices.
      3. Tap Options.
      4. Tap Enter Add Mode.
  8. Wait for the bolded message, Checking for new devices on the network.
  9. Once the Z-Wave controller is in Add Mode, press pairing  on the Temperature Sensor to add it to the Z-Wave network. The light on the Temperature Sensor will turn solid white when it has been successfully added. The device will also appear on the Partner Portal or MobileTech app.

Make thermostat schedules even more precise by assigning one or more Temperature Sensors to the Temperature Presets.

Example: Match the bedroom Temperature Sensor to the Sleep Preset, or the family room Temperature Sensor to the Home Preset. That way, the system is able to cool the right rooms in the house to the target temperature at the times they are in use.

To get started, click Detailson the Thermostat card and then click Schedules. Schedules can then be edited from this page.

Select one or more Temperature Sensors to directly control your HVAC system when there’s no thermostat schedule set.

When clicking remote-temperature, a window appears. From here, one or more Temperature Sensors can be selected. The HVAC system monitors the average temperature reported by the selected sensors and keep the average steady at the target temperature.

Example: If the nighttime target temperature is 70 degrees, and all bedroom Temperature Sensors are selected, then the average of temperature across the bedrooms are maintained at 70 degrees.

Frequently Asked Questions

How do I see my Smart Temperature Sensor in the app?
Open the Grand Alarms Smart Home App and go to the thermostat or temperature sensor area of your account. If the sensor has been added to your system, you should be able to view the room name, temperature reading, humidity reading, and sensor status.
In the Grand Alarms Smart Home App, go to your device settings or manage devices section, find the Smart Temperature Sensor, and edit the device name. We recommend naming each sensor by room, such as Baby Room, Basement, Office, Primary Bedroom, or Storage Room, so alerts are easy to understand.
Temperature alerts can be configured through the Grand Alarms Smart Home App or customer website, depending on your account setup. Choose the room sensor, select the high or low temperature threshold, and save the alert. Grand Alarms can help set this up during installation so the alert range makes sense for your home.
Humidity alerts can be configured by selecting the Smart Temperature Sensor and choosing the humidity level you want to be notified about. This is useful for basements, laundry rooms, storage rooms, or other areas where damp air can become uncomfortable.
The Smart Temperature Sensor uses a CR2450 coin cell battery. The cover can be opened, the old battery removed, and the new battery inserted with the correct polarity. If you are not comfortable handling the sensor, Grand Alarms can help.
Alert recipients are usually managed in the notification settings of the Grand Alarms Smart Home App or customer website. You can choose who receives alerts by text, email, or push notification, depending on your system setup and notification options.
You can turn off or edit alerts from the notification settings in the Grand Alarms Smart Home App or customer website. Find the alert connected to the Smart Temperature Sensor, then disable it or adjust the alert range.
Open the Grand Alarms Smart Home App and view the room where the Smart Temperature Sensor is installed. The sensor can display humidity along with temperature, depending on your system setup and service package.
The Smart Temperature Sensor can be paired with a compatible smart thermostat. Once paired, the thermostat can use selected sensor readings to support better comfort control, including temperature averaging and room-based comfort settings where available.
Temperature averaging is available when Smart Temperature Sensors are paired with a compatible smart thermostat. Select the rooms or sensors you want included, and the system can use those readings together to support a more balanced comfort setting.
With compatible thermostat schedules, sensors may be assigned to different comfort periods. For example, you may use bedroom sensors at night, a main living area during the day, and a home office during work hours. This helps the system support comfort based on how you actually use the home.
With compatible thermostat scheduling, you can create a nighttime schedule and select the bedroom sensor or bedroom sensor group for that period. This lets the system focus on the rooms you care about most during sleep hours.
Scenes can include thermostat actions, and compatible systems may allow specific temperature sensors to be used with those thermostat settings. For example, a “Sleep” scene may use bedroom sensors, while a “Home” scene may use living area sensors.
First, check that the sensor is powered and within range. If possible, remove and reinsert the battery, then allow the device to reconnect. If the malfunction remains, contact Grand Alarms so we can check signal strength, device communication, and system pairing.
Without a compatible smart thermostat, the Smart Temperature Sensor can still be useful for viewing temperature and humidity readings and receiving alerts. Advanced features like thermostat control and temperature averaging require compatible thermostat equipment.

The maximum Smart Temperature Sensors you can enroll in your smart home is 10.

Refer a Friend or Family Member

When someone you refer joins Grand Alarms, you’ll receive 2 months of free service as a thank-you.

Need More Help?

Specs

Dimensions: 1.2 x 1.6 x 0.47’’ (30.8 x 40.8 x 11.9 mm)

Communication:
Z-Wave SmartStart
Z-Wave S2
Authenticated/Unauthenticated

Operating Temperature Range: 14°F to 158°F (-10°C to 70°C)

Operating humidity: 80% (non-condensing)

Use: Indoor

Power: Wireless, Battery 

Available Colours

White

Documentation

This sensor contains a user replaceable coin cell battery. If the sensor has reported a low battery or is not illuminating the front LED when the sensor is slid open, replace the battery.

Important: Prior to replacing the battery, take note of the Coin cell battery notices.

  1. Slide the ADC-S40-T open. The LED should turn on then off within a few seconds.

    slide device open
     
  2. Remove screw.

    remove screw
     
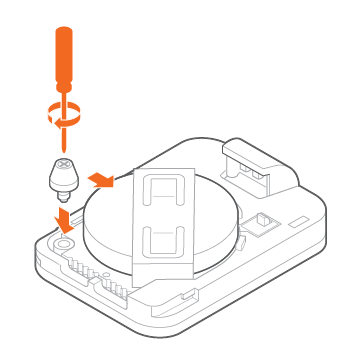
  3. Replace the battery with one CR2450 coin cell battery, then replace screw.

    replace battery, screw
  4. Slide door back into place. The LED on the front cover will blink to indicate the sensor has powered on.
    slide cover closed
If the sensor is not communicating with the Z-Wave controller
  1. Slide the device open. The LED should turn on and then turn off within a few seconds.

    Alarm.com Temperature Sensor (ADC-S40-T) - Sliding Open

    If the LED behavior is different, the sensor cannot communicate with the Z-Wave controller. Follow these steps to fix the communication problems:
    1. Install a Z-Wave repeater between the Z-Wave controller and the sensor.
       
      Note: Any AC-powered Z-Wave device will act as a repeater and improve the range between the Z-Wave controller and the Z-Wave device you are installing.
       
    2. If the previous step does not resolve the issue, try deleting the sensor from the network (see next section) and add it again.
  1. Install the Z-Wave controller.
  2. Place all other Z-Wave devices in their final locations.
  3. If installing other Z-Wave devices, make sure to install and add them to the network first. After all other Z-Wave devices have been added to the network:
    1. Run a Network Rediscovery.
    2. Verify that the Link Quality for all devices is good.
  4. Ensure the panel and the Temperature Sensors are in their final locations.
  5. Log in to the Partner Portal or MobileTech app. 
  6. Find the customer account.
  7. Put the Z-Wave controller into Add Mode:
    • To put the panel into Add Mode using the Partner Portal:
      1. Click Equipment.
      2. Click Z-Wave Devices.
      3. In Manage Devices, click Add a Z-Wave Device.
    • To put the Z-Wave controller into Add Mode using the MobileTech app:
      1. Tap Equipment.
      2. Tap Z-Wave Devices.
      3. Tap Options.
      4. Tap Enter Add Mode.
  8. Wait for the bolded message, Checking for new devices on the network.
  9. Once the Z-Wave controller is in Add Mode, press pairing  on the Temperature Sensor to add it to the Z-Wave network. The light on the Temperature Sensor will turn solid white when it has been successfully added. The device will also appear on the Partner Portal or MobileTech app.

Make thermostat schedules even more precise by assigning one or more Temperature Sensors to the Temperature Presets.

Example: Match the bedroom Temperature Sensor to the Sleep Preset, or the family room Temperature Sensor to the Home Preset. That way, the system is able to cool the right rooms in the house to the target temperature at the times they are in use.

To get started, click Detailson the Thermostat card and then click Schedules. Schedules can then be edited from this page.

Select one or more Temperature Sensors to directly control your HVAC system when there’s no thermostat schedule set.

When clicking remote-temperature, a window appears. From here, one or more Temperature Sensors can be selected. The HVAC system monitors the average temperature reported by the selected sensors and keep the average steady at the target temperature.

Example: If the nighttime target temperature is 70 degrees, and all bedroom Temperature Sensors are selected, then the average of temperature across the bedrooms are maintained at 70 degrees.

Frequently Asked Questions

How do I see my Smart Temperature Sensor in the app?
Open the Grand Alarms Smart Home App and go to the thermostat or temperature sensor area of your account. If the sensor has been added to your system, you should be able to view the room name, temperature reading, humidity reading, and sensor status.
In the Grand Alarms Smart Home App, go to your device settings or manage devices section, find the Smart Temperature Sensor, and edit the device name. We recommend naming each sensor by room, such as Baby Room, Basement, Office, Primary Bedroom, or Storage Room, so alerts are easy to understand.
Temperature alerts can be configured through the Grand Alarms Smart Home App or customer website, depending on your account setup. Choose the room sensor, select the high or low temperature threshold, and save the alert. Grand Alarms can help set this up during installation so the alert range makes sense for your home.
Humidity alerts can be configured by selecting the Smart Temperature Sensor and choosing the humidity level you want to be notified about. This is useful for basements, laundry rooms, storage rooms, or other areas where damp air can become uncomfortable.
The Smart Temperature Sensor uses a CR2450 coin cell battery. The cover can be opened, the old battery removed, and the new battery inserted with the correct polarity. If you are not comfortable handling the sensor, Grand Alarms can help.
Alert recipients are usually managed in the notification settings of the Grand Alarms Smart Home App or customer website. You can choose who receives alerts by text, email, or push notification, depending on your system setup and notification options.
You can turn off or edit alerts from the notification settings in the Grand Alarms Smart Home App or customer website. Find the alert connected to the Smart Temperature Sensor, then disable it or adjust the alert range.
Open the Grand Alarms Smart Home App and view the room where the Smart Temperature Sensor is installed. The sensor can display humidity along with temperature, depending on your system setup and service package.
The Smart Temperature Sensor can be paired with a compatible smart thermostat. Once paired, the thermostat can use selected sensor readings to support better comfort control, including temperature averaging and room-based comfort settings where available.
Temperature averaging is available when Smart Temperature Sensors are paired with a compatible smart thermostat. Select the rooms or sensors you want included, and the system can use those readings together to support a more balanced comfort setting.
With compatible thermostat schedules, sensors may be assigned to different comfort periods. For example, you may use bedroom sensors at night, a main living area during the day, and a home office during work hours. This helps the system support comfort based on how you actually use the home.
With compatible thermostat scheduling, you can create a nighttime schedule and select the bedroom sensor or bedroom sensor group for that period. This lets the system focus on the rooms you care about most during sleep hours.
Scenes can include thermostat actions, and compatible systems may allow specific temperature sensors to be used with those thermostat settings. For example, a “Sleep” scene may use bedroom sensors, while a “Home” scene may use living area sensors.
First, check that the sensor is powered and within range. If possible, remove and reinsert the battery, then allow the device to reconnect. If the malfunction remains, contact Grand Alarms so we can check signal strength, device communication, and system pairing.
Without a compatible smart thermostat, the Smart Temperature Sensor can still be useful for viewing temperature and humidity readings and receiving alerts. Advanced features like thermostat control and temperature averaging require compatible thermostat equipment.

The maximum Smart Temperature Sensors you can enroll in your smart home is 10.

Request your free quote

Looking for the best security company near you? Fill out this quick form, and one of our local security experts will call you back the same day.

Request your free quote

Looking for the best security company near you? Fill out this quick form, and one of our local security experts will call you back the same day.

Request your free quote

Looking for the best security company near you? Fill out this quick form, and one of our local security experts will call you back the same day.

Request your free quote

Looking for the best security company near you? Fill out this quick form, and one of our local security experts will call you back the same day.