
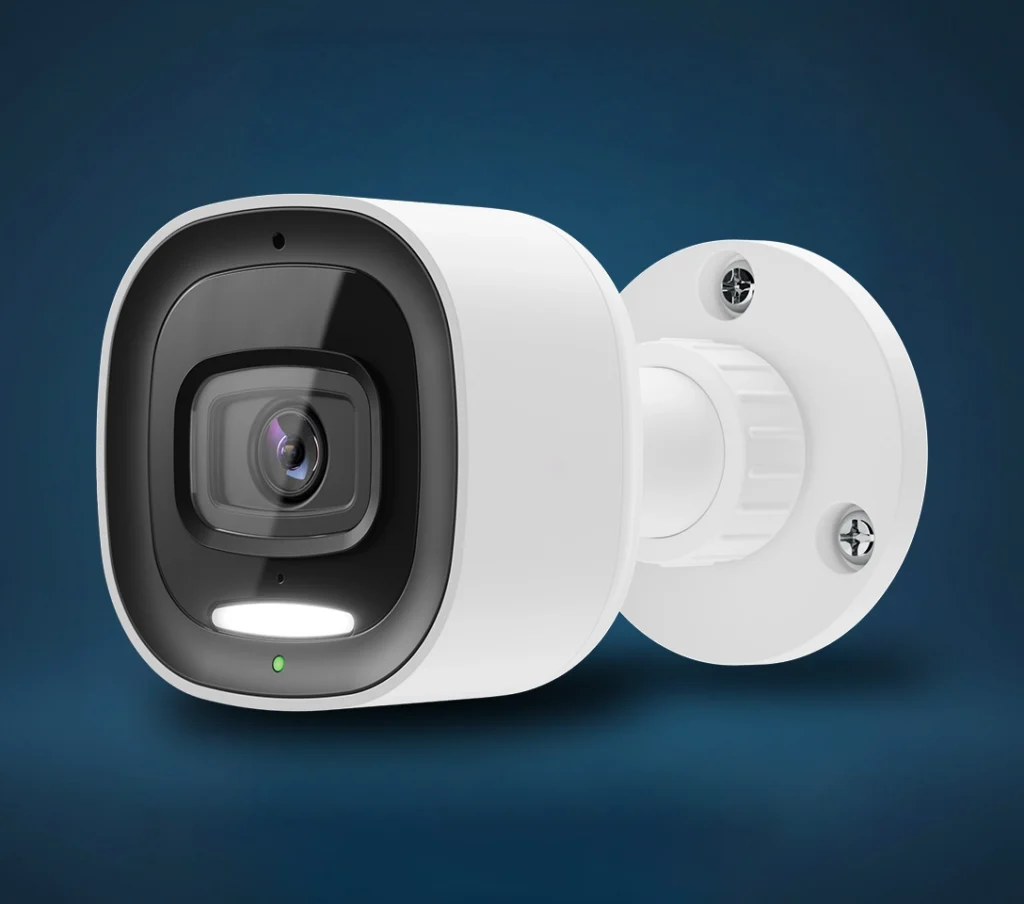
Specs
Model: ADC-VC730P
Product Type: Outdoor PoE security camera
Resolution: 4MP
Maximum Video Resolution: 2688 × 1520
Image Sensor: 1/3” 4MP sensor
HDR: Supported
Lens: 2.49 mm fixed lens
Aperture: F1.7
Field of View: 129° horizontal, 68° vertical, 153° diagonal
Video Compression: H.264
Night Vision Range: Up to 49 ft / 15 m
Audio: Built-in microphone and speaker
Ethernet: 10/100 Mbps RJ-45
Power Input: PoE+
Local Storage: microSD card support up to 1TB
Weather Rating: IP66
Operating Temperature: -58°F to 122°F / -50°C to 50°C
Operating Humidity: Less than 95% relative humidity, non-condensing
Dimensions: 4.8” × 3.1” × 3.1”
Dimensions: 12.2 × 7.8 × 7.8 cm
Kit Contents
Common kits include the valve plus compatible flood sensors
Documentation
Data Sheet
Installation Guide
Factory Reset to Its Default Settings
Resetting a video device to its factory defaults removes all programming and memory from the device.
Important: Wait at least 2 minutes for the video device to power on fully before performing the following procedure.
The factory reset might fail if the device is still powering on.
Reset Procedure
1. Press and hold the WPS/Reset button until the LED is flashing green and red (about 12 seconds), then release the button.
2. The camera will reboot to factory default.
Reset Button Location
In front of the SD card door on the bottom of the device.
Reset Button Image
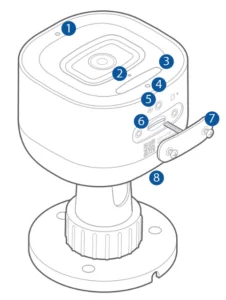
❶ Ambient Light Sensor
❷ Microphone
❸ Spotlight
❹ Status LED
❺ WPS/Reset Button
❻ SD Card Slot
❼ SD Card Door
❽ Speaker
Important: Once a video device has been reset, it is normal for the LED to turn off momentarily. It is best to leave the video device plugged into power and undisturbed for 2 minutes after performing the factory reset.
Configure Video Analytics Rule
It is now easier than ever for customers to create, edit, and customize their recording rules. First, the screens for individual recordings rules now include collapsible cards for each sub-section (e.g., Perimeter Guard®, lighting automation). The Ground Zone or Tripwire is also displayed on the individual rules page for a single-page viewing experience. On the Recording Rules page, Video Analytics rules are grouped by camera and each rule includes a thumbnail of the configured Ground Zone or Tripwire.
Outdoor Spotlight Camera’s Video Analytics means less noise and more relevant recordings. Customers select the event types they are interested in (e.g., person, vehicle, animal) and the Outdoor Spotlight Camera will not record when Other event types occur.
Create a Video Analytics rule
Use a Tripwire rule to capture movement through a specified area. Use a Ground Zone rule to capture an object lingering in a specified area.
To create a tripwire recording rule:
1. Log in to the Customer website.
2. Click Video.
3. In Video, click Recording Rules.
4. Click Add New Rule.
5. In New Video Rule, click Video Analytics.
6. In Select Camera, click the desired device to use for the recording rule.
7. In Select Type, click Tripwire.
8. Click Next.
9. Enter a name for the rule.
10. In Motion Area, click and drag the endpoints of the tripwire to the desired location.
11. In Direction, click to select Both Directions if the tripwire should detect motion coming from either side.
12. In Detection Type, click to select the desired object(s) to be detected:
• Person
• Vehicle
• Animal
13. In Timeframe, click to select the desired timeframe:
• All Times – This will detect motion every time the tripwire is crossed.
• Custom – Select the desired days of the week and times for motion to be detected.
• While on vacation – Select the desired dates for motion to be detected.
14. If desired, click the Advanced Settings dropdown menu to set recording rule exceptions (e.g., based on the panel’s arming state or the location of Geo-Devices).
15. Use the Minimum delay between clips dropdown menu to select the desired time to pass before a new clip is recorded.
16. If desired, click the Perimeter Guard® toggle switch to enable a light and/or audio alert when motion is detected.
a. If desired, click the Camera light alert toggle switch to enable camera lights when motion is detected.
i. Use the Duration dropdown menu to select the amount of time the light alert should be active.
b. If desired, click the Camera audio alert toggle switch to enable an audio alert when motion is detected.
i. Use the Audio Sound dropdown menu to select the desired sound to play.
ii. Use the Volume slider to select the desired volume for the audio alert.
c. Use the Set minimum delay between clips dropdown menu to select the desired time to pass before a new clip is recorded.
17. If desired, click the Light Automation toggle switch to enable light automation actions for when the recording rule is triggered.
a. In Select lights, click to select all applicable lights to trigger when the rule triggers.
b. Use the Duration dropdown menu to select the amount of time the selected light(s) should be active.
c. Click the desired Detection Type checkboxes (i.e., Person, Vehicle, Animal) for the event(s) you that should trigger the light automation.
d. In Timeframe, click to select the desired timeframe (i.e., At all times, Only during the following times, Only after Sunset).
18. If desired, click the Notifications toggle switch to enable notifications when motion is detected.
a. In Detection Type, click to select the desired object(s) to be notified about:
• Person
• Vehicle
• Animal
b. In Recipients, click to select the desired recipient(s) for the notifications.
• Use the Attach a Thumbnail dropdown menu to select whether or not a thumbnail is sent with the notifications.
19. Click Save.
To create a ground zone recording rule:
1. Log in to the Customer website.
2. Click Video.
3. In Video, click Recording Rules.
4. Click Add New Rule.
5. In New Video Rule, click Video Analytics.
6. In Select Camera, click the desired device to use for the recording rule.
7. In Select Type, click Ground Zone.
8. Click Next.
9. Enter a name for the rule.
10. In Motion Area, use the corners of the shape to select the desired area for motion detection.
• Click Clear Ground Zone to remove the existing shape and click four new corners to create a new ground zone area.
11. Using the Duration inside area of interest dropdown menu, select how long the object needs to be within the ground zone area before the rule triggers.
12. In Detection Type, click to select the desired object(s) to be detected:
• Person
• Vehicle
• Animal
13. In Timeframe, click to select the desired timeframe:
• All Times – This will detect motion every time the tripwire is crossed.
• Custom – Select the desired days of the week and times for motion to be detected.
• While on vacation – Select the desired dates for motion to be detected.
14. If desired, click the Advanced Settings dropdown menu to set recording rule exceptions (e.g., based on the panel’s arming state or the location of Geo-Devices).
15. Use the Minimum delay between clips dropdown menu to select the desired time to pass before a new clip is recorded.
16. If desired, click the Perimeter Guard® toggle switch to enable a light and/or audio alert when motion is detected.
a. If desired, click the Camera light alert toggle switch to enable camera lights when motion is detected.
i. Use the Duration dropdown menu to select the amount of time the light alert should be active.
b. If desired, click the Camera audio alert toggle switch to enable an audio alert when motion is detected.
i. Use the Audio Sound dropdown menu to select the desired sound to play.
ii. Use the Volume slider to select the desired volume for the audio alert.
c. Use the Set minimum delay between clips dropdown menu to select the desired time to pass before a new clip is recorded.
17. If desired, click the Light Automation toggle switch to enable light automation actions for when the recording rule is triggered.
a. In Select lights, click to select all applicable lights to trigger when the rule triggers.
• Vehicle
• Animal
b. In Recipients, click to select the desired recipient(s) for the notifications.
• Use the Attach a Thumbnail dropdown menu to select whether or not a thumbnail is sent with the notifications.
19. Click Save.
Help Videos
Outdoor Floodlight Camera
Frequently Asked Questions
How do I watch my Outdoor Spotlight Camera live from the Alarm.com app?
Open the Alarm.com app and tap the Video section. Select your Outdoor Spotlight Camera to view the live feed. From there, you may also be able to use features like two-way audio, saved clips, spotlight control, and event history, depending on your service plan and camera settings.
Why is my Outdoor Spotlight Camera not loading live video?
If live video is not loading, check that your internet connection is working and that the camera has power. Since this camera uses a PoE Ethernet connection, the network cable, PoE switch, or PoE injector may need to be checked. You can also try closing and reopening the Alarm.com app. If the camera still does not load, contact Grand Alarms for support.
Can more than one person view the camera from their phone?
Yes. Additional users can view the camera if they have been added to the Alarm.com account with the correct permissions. The main account holder can manage user access through the Alarm.com app or website.
How do I save or download a video clip from the camera?
Open the Alarm.com app, go to Video, and select the saved clip you want to view. If downloading or sharing is available on your account, you will see options to save or share the clip from the clip details screen. Availability may depend on your video service package.
How do I turn the spotlight on or off manually?
In the Alarm.com app, open the live view for your Outdoor Spotlight Camera. If manual spotlight control is enabled, you should see an option to turn the light on or off. The exact controls may vary depending on your app version and account settings.
Can the spotlight turn on automatically when someone enters my property?
Yes. The spotlight can be used with camera rules and detection settings so it activates when motion or a person is detected in a selected area. This is useful for driveways, walkways, side yards, backyards, and other areas where added visibility and deterrence are needed.
Why is the spotlight not turning on at night?
The spotlight may not turn on if the rule is not enabled, the detection area is not set correctly, the schedule is wrong, or there is already enough light in the area. Check the camera rules in the Alarm.com app and make sure the spotlight action is included in the rule.
Can the camera play a warning sound when someone is detected?
Yes, the camera may support deterrence features such as warning sounds when a person is detected. This depends on how the camera is configured in Alarm.com. These settings are usually managed through Video Analytics, detection rules, or Perimeter Guard features.
What is Perimeter Guard and how does it help deter visitors?
Perimeter Guard is a deterrence feature that can respond when the camera detects activity in a selected area. Depending on the setup, the camera may use its spotlight and audio warning features to help discourage unwanted activity before someone gets closer to the property.
How do I set up alerts for people, vehicles, or animals?
In the Alarm.com app, go to the camera’s Video Analytics or recording rules section. From there, you can create a rule and choose what type of activity should trigger an alert, such as a person, vehicle, or animal. You can also adjust the detection area and schedule so alerts only happen when they matter.
Why am I getting too many motion alerts from my camera?
Too many alerts usually means the detection area is too broad or the rule is too sensitive. Common causes include passing cars, trees moving in the wind, shadows, headlights, animals, or activity from a sidewalk or road. Adjusting the detection zone and using Video Analytics instead of basic motion detection can reduce unnecessary alerts.
Why am I not getting notifications from my Outdoor Spotlight Camera?
Check that notifications are enabled in both the Alarm.com app and your phone settings. Also confirm that the camera rule is active, the schedule is correct, and the rule is set to send notifications. If everything looks correct but alerts still do not come through, the rule may need to be recreated or reviewed.
How do I reduce false alerts from cars, trees, shadows, or pets?
Use Video Analytics rules and draw the detection area only around the space you care about, such as your driveway, porch, gate, or walkway. Avoid including roads, sidewalks, trees, reflective surfaces, and areas with frequent background movement. This gives the camera a cleaner job to do, which is always nice.
Can I choose which areas of the camera view should trigger alerts?
Yes. You can create custom detection zones so the camera only watches specific areas. For example, you can set the camera to watch your driveway but ignore the street, or monitor your front steps but ignore the sidewalk.
What is the difference between regular motion detection and Video Analytics?
Regular motion detection looks for movement in the camera view. Video Analytics is smarter because it can identify certain types of activity, such as people, vehicles, or animals. For most customers, Video Analytics is the better option because it helps reduce unnecessary alerts.
Why is my camera not recording video clips?
The camera may not record clips if the recording rule is turned off, the schedule is inactive, the camera is offline, or the account does not have the correct video recording plan. Check the recording rules in the Alarm.com app and confirm that the camera is online.
Can the Outdoor Spotlight Camera record continuously?
The camera may support continuous recording depending on your setup, service plan, and storage configuration. Some customers use event-based clips, while others may have continuous recording options through compatible Alarm.com video services or local storage.
Does this camera support microSD card recording?
Yes. The Outdoor Spotlight Camera supports microSD card storage when configured properly. This can be used for certain recording features, depending on the camera setup and service plan. If you are not sure whether local recording is active, Grand Alarms can review the setup.
Does the Outdoor Spotlight Camera use Wi-Fi or an Ethernet cable?
The ADC-VC730P model uses a wired PoE Ethernet connection. PoE stands for Power over Ethernet, which means the camera receives both power and network connection through one Ethernet cable. This is more stable than Wi-Fi, but it does mean the cable, PoE switch, or injector must be working properly.
What should I do if my Outdoor Spotlight Camera goes offline?
First, check whether your internet is working. Then check the Ethernet cable connected to the camera and make sure the PoE switch or injector has power. If other cameras are working but this one is offline, the issue may be with the cable, port, power source, or camera connection. If the camera does not come back online, contact Grand Alarms for service.
Is the Outdoor Spotlight Camera weather-resistant?
Yes. The camera is designed for outdoor use and can handle normal outdoor weather conditions when installed correctly. It should still be mounted in a suitable location and installed properly to protect the cable connection and maintain reliable performance.
Why does the camera image look blurry, dark, or washed out at night?
Night image issues are often caused by glare, reflections, dirt on the lens, nearby walls, bright lights, or the camera angle. Clean the lens gently and check whether the camera is pointed too close to a wall, soffit, window, or reflective surface. Small angle changes can make a big difference at night.
Does the camera record in color at night?
The camera can provide color night video when there is enough light or when the spotlight is used. In very dark conditions, the camera may rely more heavily on night vision features. For the best nighttime image, make sure the spotlight settings and camera angle are properly configured.
Can I talk through the Outdoor Spotlight Camera?
Yes. The camera supports two-way audio when enabled. Open the camera’s live view in the Alarm.com app and use the talk feature to speak through the camera. Audio quality may depend on the camera location, background noise, phone connection, and internet speed.
Can I change when the camera sends alerts?
Yes. Camera alerts can usually be scheduled so they only happen during certain times, such as overnight, during business hours, or when the security system is armed. This helps prevent notification overload, which is how good technology avoids becoming a tiny pocket nuisance.
Who should I contact if my camera still is not working properly?
If the camera is offline, not recording, not sending alerts, or not behaving as expected after basic troubleshooting, contact Grand Alarms. We can review the camera settings, Alarm.com rules, connection status, and service plan to help identify the issue.
Refer a Friend or Family Member
When someone you refer joins Grand Alarms, you’ll receive 2 months of free service as a thank-you.
Specs
Model: ADC-VC730P
Product Type: Outdoor PoE security camera
Resolution: 4MP
Maximum Video Resolution: 2688 × 1520
Image Sensor: 1/3” 4MP sensor
HDR: Supported
Lens: 2.49 mm fixed lens
Aperture: F1.7
Field of View: 129° horizontal, 68° vertical, 153° diagonal
Video Compression: H.264
Night Vision Range: Up to 49 ft / 15 m
Audio: Built-in microphone and speaker
Ethernet: 10/100 Mbps RJ-45
Power Input: PoE+
Local Storage: microSD card support up to 1TB
Weather Rating: IP66
Operating Temperature: -58°F to 122°F / -50°C to 50°C
Operating Humidity: Less than 95% relative humidity, non-condensing
Dimensions: 4.8” × 3.1” × 3.1”
Dimensions: 12.2 × 7.8 × 7.8 cm
Kit Contents
Common kits include the valve plus compatible flood sensors
Documentation
Data Sheet
Installation Guide
Factory Reset to Its Default Settings
Resetting a video device to its factory defaults removes all programming and memory from the device.
Important: Wait at least 2 minutes for the video device to power on fully before performing the following procedure.
The factory reset might fail if the device is still powering on.
Reset Procedure
1. Press and hold the WPS/Reset button until the LED is flashing green and red (about 12 seconds), then release the button.
2. The camera will reboot to factory default.
Reset Button Location
In front of the SD card door on the bottom of the device.
Reset Button Image
❶ Ambient Light Sensor
❷ Microphone
❸ Spotlight
❹ Status LED
❺ WPS/Reset Button
❻ SD Card Slot
❼ SD Card Door
❽ Speaker
Important: Once a video device has been reset, it is normal for the LED to turn off momentarily. It is best to leave the video device plugged into power and undisturbed for 2 minutes after performing the factory reset.
Configure Video Analytics Rule
It is now easier than ever for customers to create, edit, and customize their recording rules. First, the screens for individual recordings rules now include collapsible cards for each sub-section (e.g., Perimeter Guard®, lighting automation). The Ground Zone or Tripwire is also displayed on the individual rules page for a single-page viewing experience. On the Recording Rules page, Video Analytics rules are grouped by camera and each rule includes a thumbnail of the configured Ground Zone or Tripwire.
Outdoor Spotlight Camera’s Video Analytics means less noise and more relevant recordings. Customers select the event types they are interested in (e.g., person, vehicle, animal) and the Outdoor Spotlight Camera will not record when Other event types occur.
Create a Video Analytics rule
Use a Tripwire rule to capture movement through a specified area. Use a Ground Zone rule to capture an object lingering in a specified area.
To create a tripwire recording rule:
1. Log in to the Customer website.
2. Click Video.
3. In Video, click Recording Rules.
4. Click Add New Rule.
5. In New Video Rule, click Video Analytics.
6. In Select Camera, click the desired device to use for the recording rule.
7. In Select Type, click Tripwire.
8. Click Next.
9. Enter a name for the rule.
10. In Motion Area, click and drag the endpoints of the tripwire to the desired location.
11. In Direction, click to select Both Directions if the tripwire should detect motion coming from either side.
12. In Detection Type, click to select the desired object(s) to be detected:
• Person
• Vehicle
• Animal
13. In Timeframe, click to select the desired timeframe:
• All Times – This will detect motion every time the tripwire is crossed.
• Custom – Select the desired days of the week and times for motion to be detected.
• While on vacation – Select the desired dates for motion to be detected.
14. If desired, click the Advanced Settings dropdown menu to set recording rule exceptions (e.g., based on the panel’s arming state or the location of Geo-Devices).
15. Use the Minimum delay between clips dropdown menu to select the desired time to pass before a new clip is recorded.
16. If desired, click the Perimeter Guard® toggle switch to enable a light and/or audio alert when motion is detected.
a. If desired, click the Camera light alert toggle switch to enable camera lights when motion is detected.
i. Use the Duration dropdown menu to select the amount of time the light alert should be active.
b. If desired, click the Camera audio alert toggle switch to enable an audio alert when motion is detected.
i. Use the Audio Sound dropdown menu to select the desired sound to play.
ii. Use the Volume slider to select the desired volume for the audio alert.
c. Use the Set minimum delay between clips dropdown menu to select the desired time to pass before a new clip is recorded.
17. If desired, click the Light Automation toggle switch to enable light automation actions for when the recording rule is triggered.
a. In Select lights, click to select all applicable lights to trigger when the rule triggers.
b. Use the Duration dropdown menu to select the amount of time the selected light(s) should be active.
c. Click the desired Detection Type checkboxes (i.e., Person, Vehicle, Animal) for the event(s) you that should trigger the light automation.
d. In Timeframe, click to select the desired timeframe (i.e., At all times, Only during the following times, Only after Sunset).
18. If desired, click the Notifications toggle switch to enable notifications when motion is detected.
a. In Detection Type, click to select the desired object(s) to be notified about:
• Person
• Vehicle
• Animal
b. In Recipients, click to select the desired recipient(s) for the notifications.
• Use the Attach a Thumbnail dropdown menu to select whether or not a thumbnail is sent with the notifications.
19. Click Save.
To create a ground zone recording rule:
1. Log in to the Customer website.
2. Click Video.
3. In Video, click Recording Rules.
4. Click Add New Rule.
5. In New Video Rule, click Video Analytics.
6. In Select Camera, click the desired device to use for the recording rule.
7. In Select Type, click Ground Zone.
8. Click Next.
9. Enter a name for the rule.
10. In Motion Area, use the corners of the shape to select the desired area for motion detection.
• Click Clear Ground Zone to remove the existing shape and click four new corners to create a new ground zone area.
11. Using the Duration inside area of interest dropdown menu, select how long the object needs to be within the ground zone area before the rule triggers.
12. In Detection Type, click to select the desired object(s) to be detected:
• Person
• Vehicle
• Animal
13. In Timeframe, click to select the desired timeframe:
• All Times – This will detect motion every time the tripwire is crossed.
• Custom – Select the desired days of the week and times for motion to be detected.
• While on vacation – Select the desired dates for motion to be detected.
14. If desired, click the Advanced Settings dropdown menu to set recording rule exceptions (e.g., based on the panel’s arming state or the location of Geo-Devices).
15. Use the Minimum delay between clips dropdown menu to select the desired time to pass before a new clip is recorded.
16. If desired, click the Perimeter Guard® toggle switch to enable a light and/or audio alert when motion is detected.
a. If desired, click the Camera light alert toggle switch to enable camera lights when motion is detected.
i. Use the Duration dropdown menu to select the amount of time the light alert should be active.
b. If desired, click the Camera audio alert toggle switch to enable an audio alert when motion is detected.
i. Use the Audio Sound dropdown menu to select the desired sound to play.
ii. Use the Volume slider to select the desired volume for the audio alert.
c. Use the Set minimum delay between clips dropdown menu to select the desired time to pass before a new clip is recorded.
17. If desired, click the Light Automation toggle switch to enable light automation actions for when the recording rule is triggered.
a. In Select lights, click to select all applicable lights to trigger when the rule triggers.
• Vehicle
• Animal
b. In Recipients, click to select the desired recipient(s) for the notifications.
• Use the Attach a Thumbnail dropdown menu to select whether or not a thumbnail is sent with the notifications.
19. Click Save.
Help Videos
Outdoor Floodlight Camera
Help Videos
Frequently Asked Questions
How do I watch my Outdoor Spotlight Camera live from the Alarm.com app?
Open the Alarm.com app and tap the Video section. Select your Outdoor Spotlight Camera to view the live feed. From there, you may also be able to use features like two-way audio, saved clips, spotlight control, and event history, depending on your service plan and camera settings.
Why is my Outdoor Spotlight Camera not loading live video?
If live video is not loading, check that your internet connection is working and that the camera has power. Since this camera uses a PoE Ethernet connection, the network cable, PoE switch, or PoE injector may need to be checked. You can also try closing and reopening the Alarm.com app. If the camera still does not load, contact Grand Alarms for support.
Can more than one person view the camera from their phone?
Yes. Additional users can view the camera if they have been added to the Alarm.com account with the correct permissions. The main account holder can manage user access through the Alarm.com app or website.
How do I save or download a video clip from the camera?
Open the Alarm.com app, go to Video, and select the saved clip you want to view. If downloading or sharing is available on your account, you will see options to save or share the clip from the clip details screen. Availability may depend on your video service package.
How do I turn the spotlight on or off manually?
In the Alarm.com app, open the live view for your Outdoor Spotlight Camera. If manual spotlight control is enabled, you should see an option to turn the light on or off. The exact controls may vary depending on your app version and account settings.
Can the spotlight turn on automatically when someone enters my property?
Yes. The spotlight can be used with camera rules and detection settings so it activates when motion or a person is detected in a selected area. This is useful for driveways, walkways, side yards, backyards, and other areas where added visibility and deterrence are needed.
Why is the spotlight not turning on at night?
The spotlight may not turn on if the rule is not enabled, the detection area is not set correctly, the schedule is wrong, or there is already enough light in the area. Check the camera rules in the Alarm.com app and make sure the spotlight action is included in the rule.
Can the camera play a warning sound when someone is detected?
Yes, the camera may support deterrence features such as warning sounds when a person is detected. This depends on how the camera is configured in Alarm.com. These settings are usually managed through Video Analytics, detection rules, or Perimeter Guard features.
What is Perimeter Guard and how does it help deter visitors?
Perimeter Guard is a deterrence feature that can respond when the camera detects activity in a selected area. Depending on the setup, the camera may use its spotlight and audio warning features to help discourage unwanted activity before someone gets closer to the property.
How do I set up alerts for people, vehicles, or animals?
In the Alarm.com app, go to the camera’s Video Analytics or recording rules section. From there, you can create a rule and choose what type of activity should trigger an alert, such as a person, vehicle, or animal. You can also adjust the detection area and schedule so alerts only happen when they matter.
Why am I getting too many motion alerts from my camera?
Too many alerts usually means the detection area is too broad or the rule is too sensitive. Common causes include passing cars, trees moving in the wind, shadows, headlights, animals, or activity from a sidewalk or road. Adjusting the detection zone and using Video Analytics instead of basic motion detection can reduce unnecessary alerts.
Why am I not getting notifications from my Outdoor Spotlight Camera?
Check that notifications are enabled in both the Alarm.com app and your phone settings. Also confirm that the camera rule is active, the schedule is correct, and the rule is set to send notifications. If everything looks correct but alerts still do not come through, the rule may need to be recreated or reviewed.
How do I reduce false alerts from cars, trees, shadows, or pets?
Use Video Analytics rules and draw the detection area only around the space you care about, such as your driveway, porch, gate, or walkway. Avoid including roads, sidewalks, trees, reflective surfaces, and areas with frequent background movement. This gives the camera a cleaner job to do, which is always nice.
Can I choose which areas of the camera view should trigger alerts?
Yes. You can create custom detection zones so the camera only watches specific areas. For example, you can set the camera to watch your driveway but ignore the street, or monitor your front steps but ignore the sidewalk.
What is the difference between regular motion detection and Video Analytics?
Regular motion detection looks for movement in the camera view. Video Analytics is smarter because it can identify certain types of activity, such as people, vehicles, or animals. For most customers, Video Analytics is the better option because it helps reduce unnecessary alerts.
Why is my camera not recording video clips?
The camera may not record clips if the recording rule is turned off, the schedule is inactive, the camera is offline, or the account does not have the correct video recording plan. Check the recording rules in the Alarm.com app and confirm that the camera is online.
Can the Outdoor Spotlight Camera record continuously?
The camera may support continuous recording depending on your setup, service plan, and storage configuration. Some customers use event-based clips, while others may have continuous recording options through compatible Alarm.com video services or local storage.
Does this camera support microSD card recording?
Yes. The Outdoor Spotlight Camera supports microSD card storage when configured properly. This can be used for certain recording features, depending on the camera setup and service plan. If you are not sure whether local recording is active, Grand Alarms can review the setup.
Does the Outdoor Spotlight Camera use Wi-Fi or an Ethernet cable?
The ADC-VC730P model uses a wired PoE Ethernet connection. PoE stands for Power over Ethernet, which means the camera receives both power and network connection through one Ethernet cable. This is more stable than Wi-Fi, but it does mean the cable, PoE switch, or injector must be working properly.
What should I do if my Outdoor Spotlight Camera goes offline?
First, check whether your internet is working. Then check the Ethernet cable connected to the camera and make sure the PoE switch or injector has power. If other cameras are working but this one is offline, the issue may be with the cable, port, power source, or camera connection. If the camera does not come back online, contact Grand Alarms for service.
Is the Outdoor Spotlight Camera weather-resistant?
Yes. The camera is designed for outdoor use and can handle normal outdoor weather conditions when installed correctly. It should still be mounted in a suitable location and installed properly to protect the cable connection and maintain reliable performance.
Why does the camera image look blurry, dark, or washed out at night?
Night image issues are often caused by glare, reflections, dirt on the lens, nearby walls, bright lights, or the camera angle. Clean the lens gently and check whether the camera is pointed too close to a wall, soffit, window, or reflective surface. Small angle changes can make a big difference at night.
Does the camera record in color at night?
The camera can provide color night video when there is enough light or when the spotlight is used. In very dark conditions, the camera may rely more heavily on night vision features. For the best nighttime image, make sure the spotlight settings and camera angle are properly configured.
Can I talk through the Outdoor Spotlight Camera?
Yes. The camera supports two-way audio when enabled. Open the camera’s live view in the Alarm.com app and use the talk feature to speak through the camera. Audio quality may depend on the camera location, background noise, phone connection, and internet speed.
Can I change when the camera sends alerts?
Yes. Camera alerts can usually be scheduled so they only happen during certain times, such as overnight, during business hours, or when the security system is armed. This helps prevent notification overload, which is how good technology avoids becoming a tiny pocket nuisance.
Who should I contact if my camera still is not working properly?
If the camera is offline, not recording, not sending alerts, or not behaving as expected after basic troubleshooting, contact Grand Alarms. We can review the camera settings, Alarm.com rules, connection status, and service plan to help identify the issue.